


Edge AI - Computer vision on the edge
Carsten Moenning, Ph.D.

Carsten Moenning, Ph.D.

Whenever network connectivity is not available, or network latency is insufficient, or there is a need for local processing due to regulatory, privacy and security concerns, or, indeed, a combination of all of these aspects is given, today’s standard cloud-based AI approach isn’t an option.
Edge AI, i.e., AI computations performed locally on the “edge” with little or no network connectivity using locally obtained data represents a viable alternative under these circumstances subject to the computation and data processing limitations of the edge device under consideration. The overall global edge computing market, of which Edge AI enabling robotic, self-driving vehicle, drone, personalised smart phone and localised medical imaging applications represents an important element, is estimated to grow to $ 1.12 trillion by 2023.
Fixing Photography | Data Driven Investor
Tom ZImberoff studied music at the University of Southern California before pivoting to photography. As a…www.datadriveninvestor.com
Reasons enough to have a look at how to get started in the Edge AI field of things. Inspired by [1][2][3], I will demonstrate how to use the open source Intel OpenVINO library together with the Intel Neural Compute Stick 2 for object detection on a commodity edge device, the Raspberry Pi. This first post of a two-post series,
provides an overview of edge AI hardware accelerator and development board options,
guides you through configuring a Raspberry Pi with an on-board camera as edge AI-ready device and
demonstrates how to install Intel OpenVINO on the Raspberry Pi and, for example, your laptop, to get ready for performing near real-time computer vision inference with the Raspberry Pi.
This first post is self-contained. Expect to need to invest about three hours to work through it end-to-end. Afterwards, you will have a computer vision inference-ready edge device, i.e., you will be all set for the implementation of use cases such as (near) real-time object detection, image segmentation, human body pose estimation, face or scene text recognition, etc. on the edge. The equally self-contained second post demonstrates the Python-based implementation, available on GitHub, of one of these use cases. 🗹
So, let’s get going with having a look at the mainstream dedicated hardware accelerator and board options for Edge AI custom-development.
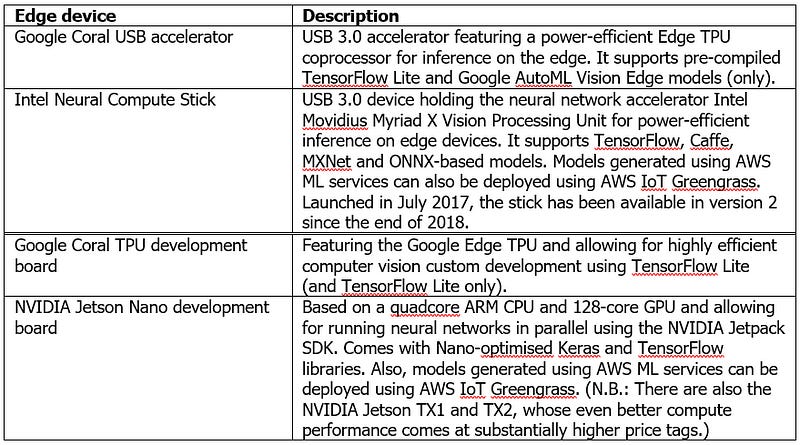
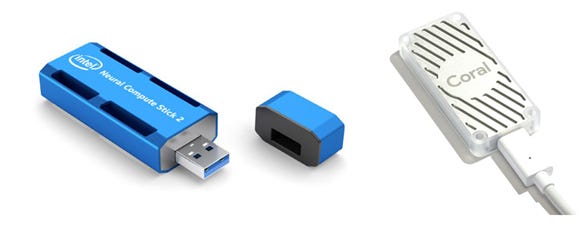
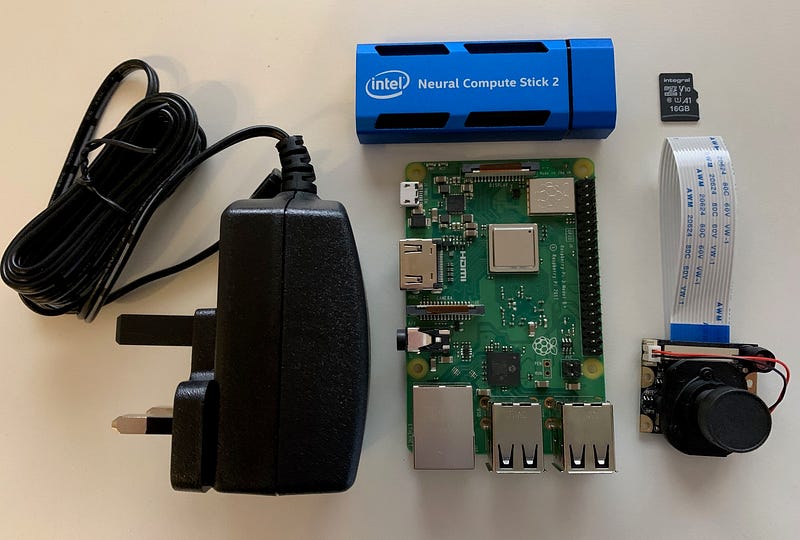
For the purposes of this post, we will focus on a Raspberry Pi 3 Model B+ featuring both an on-board camera and an Intel Neural Compute Stick 2 (NCS2). The Raspberry Pi 3 CPU operates at 1.4 GHz with 1 GB of RAM. Quite respectable as these performance figures might be for this kind of device, they make running state-of-the-art computer vision applications a no-go. This is where coprocessors such as the Google Coral or the Intel NCS2 come in. To quote the official Intel product specification: “The Intel NCS2 is built on the Intel Movidius™ Myriad™ X VPU featuring 16 programmable shave cores and a dedicated neural compute engine for hardware acceleration of deep neural network inferences.” It comes at roughly 1 watt of power consumption. That is, it makes state-of-the-art deep learning-based computer vision inference on Raspberry Pi a realistic proposition.
⚡ Please note that these accelerators are primarily meant for computer vision inference, i.e., they are not meant for model training on the edge device. The retraining, a.k.a. fine-tuning, of a pretrained deep learning model via transfer learning on the edge, however, represents a distinct possibility. ⚡
Apart from the NCS2 and to keep things simple, I suggest you purchase a Raspberry Pi 3 Model B+ starter kit. It typically comes with all the necessary bits and pieces, excluding an on-board camera, but including NOOBS and Raspbian OS pre-installed on an accompanying microSD card. This will save you the (mild) trouble of purchasing the various bits and pieces separately and then downloading/flashing a Raspbian OS image onto the microSD card to make the Raspberry Pi bootable. This benefit comes at the price of higher overall costs compared to purchasing the bits and pieces individually. If opting against a starter kit, see here for a NOOBS/Raspbian OS installation guide.
⚡ The Raspberry Pi 3 Model B+ comes with an USB 2.0 port only, so there is a performance hit when using it with the USB 3.0-enabled NCS2. I didn’t test this, but the example in this post should also work, actually even faster, in case you are having a Raspberry Pi 4 at hand, which comes with USB 3.0. ⚡
Overall, at the time of writing, this hardware setup will come at:
~€ 70, for a Raspberry Pi 3 Model B+ starter kit
~€ 28, for a Raspberry Pi 3 Model B+-compatible on-board camera
~€ 70, for the Intel NCS2
Assuming your Raspberry Pi and NCS2 hardware setup to be complete 🗹, we will go through the following steps next.
Configuring your Raspberry Pi
Installing your on-board camera module
Installing the OpenVINO toolkit for Raspbian OS
Performing face detection using a sample object detection model
1. Configuring your Raspberry Pi
You can follow along by either opening up terminal sessions and working directly on your Raspberry Pi, or by enabling SSH or VNC on your Raspberry Pi, followed by establishing a remote connection to the Pi from your main machine. Use the ifconfig command on the Pi to obtain its IP address.
To be on the safe side memory-wise when planning to do doing custom-development after having worked through this post, increase the Raspberry Pi’s swap partition size from its default value of 100 MB to 1,024 MB by opening a terminal session and editing the corresponding configuration file entry. (We are using nano as the text editor of choice to modify the dphys-swapfile, but you can, of course, use any alternative text editor.)
sudo nano /etc/dphys-swapfile

Running the free -h command should confirm the new swap file size of 1 GB.

Finally, you would want to sudo apt-get update && sudo apt-get upgrade in the terminal session to make sure that your Raspberry Pi is fully up-to-date, followed by a system reboot.
This leaves the installation of the on-board camera module as far as the Raspberry Pi configuration is concerned. 🗹
2. Installing your on-board camera module
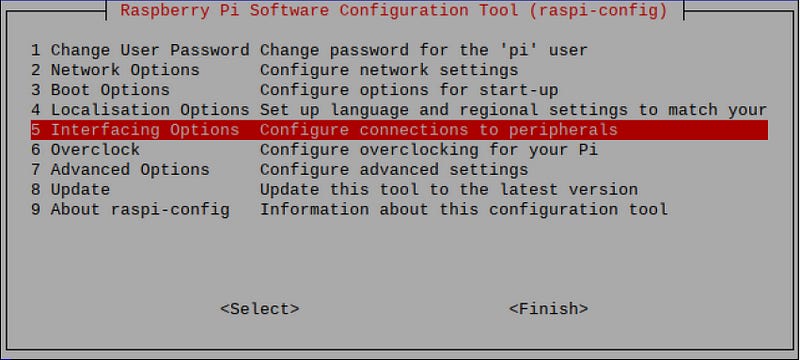
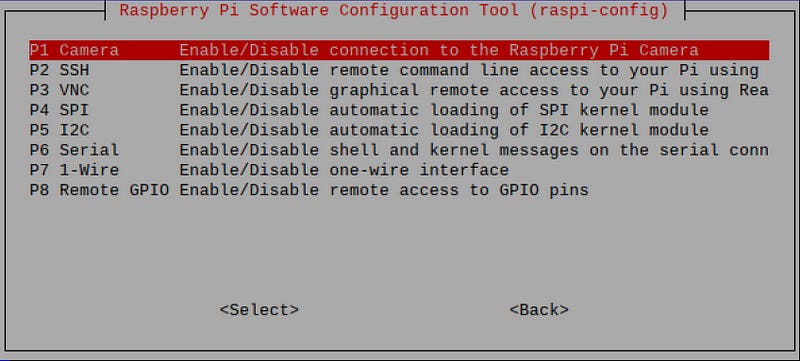
Open the Raspberry Pi configuration tool from the terminal, enter sudo raspi-config and select “Enable camera” within the “Interfacing options” dialog.
Next, see, for example, here for properly physically connecting your camera module to the Raspberry Pi board, followed by a system reboot. After boot-up, open a terminal session and enter sudo modprobe bcm2835-v4l2 to activate the camera.
You should now be able to take still images and record video via the camera using the raspistill and raspivid commands, respectively. See also here for a straightforward step-by-step guide, including additional information as to how to change image settings and the like.
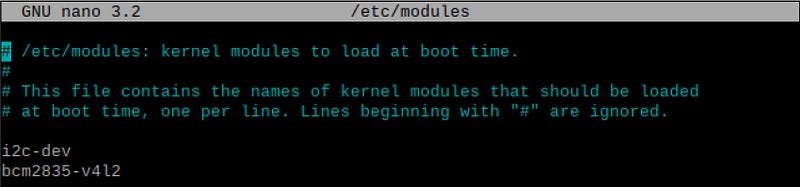
To avoid having to execute the modprobe command every time you launch your Raspberry Pi, include the camera module in the form of bcm2835-v4l2 in the default list as follows, followed by a system reboot. 🗹
sudo nano /etc/modules
3. Installing the OpenVINO toolkit for Raspbian OS
Download the latest version of the “OpenVINO toolkit for Raspbian OS” onto your Raspberry Pi via this OpenVINO download site. Within this site, look for a filename along the lines of:
l_openvino_toolkit_runtime_raspbian_p_<version>.tgz
For example, at the time of writing, the latest OpenVINO for Raspbian version reads: 2020.1.023
⚡ To keep things simple at this stage, I go into more detail regarding the OpenVINO toolkit, its elements and the typical OpenVINO workflow for deep learning model deployment on the edge in the second post of this two-post series. ⚡
Unlike its Linux version, the OpenVINO for Raspbian download does not come with a software installer, so there are a number of manual installation steps you have to go through by following Intel’s fairly straightforward official “Install OpenVINO toolkit for Raspbian OS” guide. Note, in particular, though:
The “optional” step of permanently setting the required environment variables is, in fact, strongly recommended, i.e., include this step:
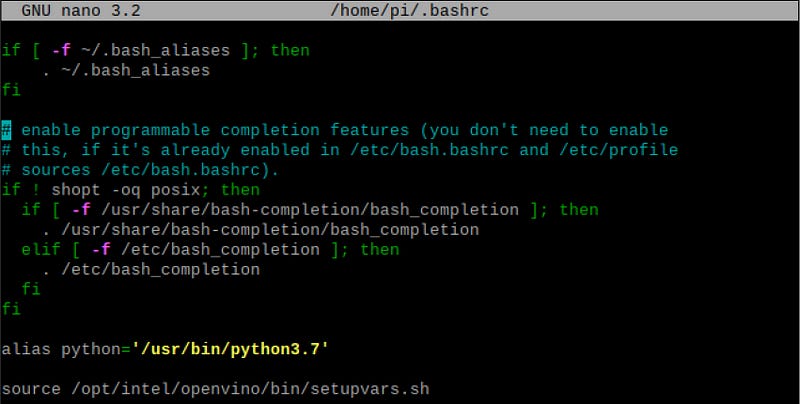
echo "source /opt/intel/openvino/bin/setupvars.sh" >> ~/.bashrc
The following step is frequently missed, but, as pointed out in the official installation guide, performing inference using the NCS2 requires the relevant USB dependencies to be in place with the help of:
sh /opt/intel/openvino/install_dependencies/install_NCS_udev_rules.shAt the time of writing, OpenVINO for Raspberry Pi expects at least Python 3.5. In case your Raspberry Pi is in need of a Python update (here, as an example, Python 3.5.6):
wget https://www.python.org/ftp/python/3.5.6/Python-3.5.6.tgzsudo tar zxf Python-3.5.6.tgzcd Python-3.5.6sudo ./configuresudo make -j4sudo make altinstall
This completes the initial setup and the NCS2 can now be plugged into a Raspberry Pi USB slot. You may want to run the lsusb command to check its availability. 🗹

4. Performing face detection using a sample object detection model
You are now all set for running an OpenVINO toy example on our edge device, the Raspberry Pi. We will run the Python version of the OpenVINO installation guide’s face detection showcase.
⚡ For ease of exposition, in the following, I am not using virtual working environments. If you are planning to develop a number of projects, I recommend doing so, for example in the form of Ian Bicking’s virtualenv, to achieve project isolation so as to avoid library conflicts and the like. ⚡
Unlike the OpenVINO toolkit version for other platforms, the OpenVINO toolkit for Raspbian OS is limited to the OpenVINO Inference Engine and does not include the OpenVINO Model Downloader. To manually download the pre-trained face detection model weights and biases (.bin file) and its network topology (.xml file), navigate to your /home/pi/models folder and execute:
wget --no-check-certificate https://download.01.org/opencv/2019/open_model_zoo/R3/20190905_163000_models_bin/face-detection-adas-0001/FP16/face-detection-adas-0001.bin
wget --no-check-certificate https://download.01.org/opencv/2019/open_model_zoo/R3/20190905_163000_models_bin/face-detection-adas-0001/FP16/face-detection-adas-0001.xml

⚡ Please make sure to download this 2019 version of the face detection model. This is due to a known incompatibility of the latest OpenVINO for Raspbian OS toolkit (2020.01) caused by its new Intermediate Representation format, v10. ⚡
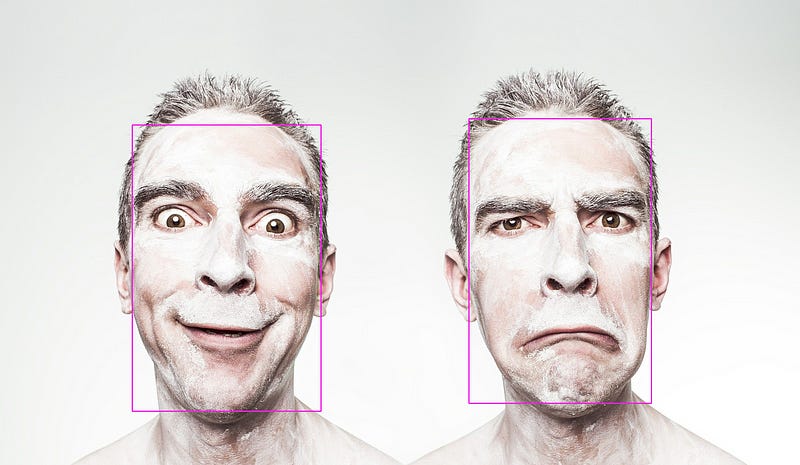
The above downloads a pre-trained MobileNet-based [4] face detection model, which takes an input image and produces an output image featuring bounding boxes around all the faces detected in the input image.
Thanks to the OpenVINO demo application, we do not need to bother with input image preprocessing and the like at this stage, but take this up when developing our own custom solution within the second post of this blog series.
To give the face detection model a test run, for example, simply take a still image of yourself using your Raspberry Pi camera and pass on the file to the model for local inference with the help of the NCS2.

Assuming that your test file (here: image.jpg) is located in the /home/pi/models/ directory:
python /opt/intel/openvino/inference_engine/samples/python/object_detection_sample_ssd/object_detection_sample_ssd.py -m /home/pi/models/face-detection-adas-0001.xml -d MYRIAD -i /home/pi/models/image.jpg
This passes the MobileNet [4] face detection model on to the OpenVINO single-shot detector sample application instructing it to use the MYRIAD, i.e., NCS2 coprocessor, for visual inference on the input image.
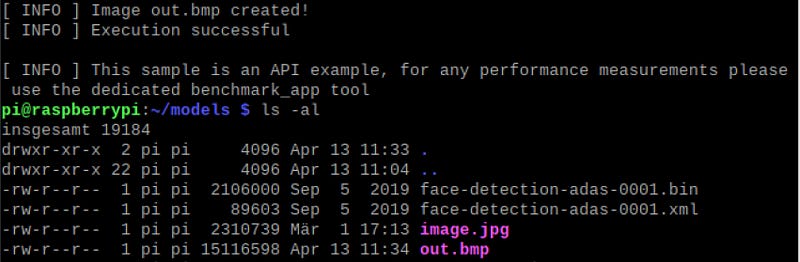
As a result, you will find an output image, named out.bmp, in the /home/pi/models directory featuring bounding boxes around all the faces detected in the input image. 🗹
And that’s all there is really to it. Having worked your way through this self-contained first post of a two-post blog series, you have successfully manged to set up a Raspberry Pi as an Edge AI device capable of performing near real-time computer vision inference. This opens up a whole realm of Edge AI use case implementation possibilities across the entire computer vision domain, arguably the most mature AI application field. In the second post of this two-post series, we demonstrate exactly that. More specifically, we go through the custom-development of a YOLOv3-based [5] (near) real-time object detection application running locally on the Edge AI-ready Raspberry Pi.
References
[1] A. Allen, Getting Started with the Intel Neural Compute Stick 2 and the Raspberry Pi, blog, 04/2019
[2] S. Boyce, AI On Raspberry Pi With The Intel Neural Compute Stick, blog, 01/2019
[3] A. Rosebrock et al., Raspberry Pi for Computer Vision - Hacker Bundle, PyImageSearch, 2020
[4] A. G. Howard et al., MobileNets: Efficient Convolutional Neural Networks for Mobile Vision Applications, arXiv:1704.04861, April 2017
[5] J. Redmon and A. Farhadi, “YOLOv3: An Incremental Improvement”, Technical Report, arXiv:1804.02767, April 2018